This is part 2 of the Easter Treats tutorials. Who knows, there's still time before Easter to do some more....please leave a comment and let me know if you would like to see more, and if you have any suggestions on something that you would like to see.
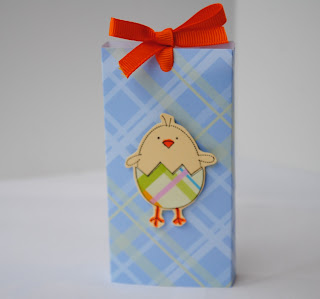
This one is another quick and easy one that you could do multiples very quickly. It's called a Slider..
Isn't he cute?!! Here's the Supply list:
Cardstock or Scrapbook Paper
Ribbon
Embellishments
Stamps (optional)
Paper Trimmer
Double Sided Tape
Dimensionals
Pack of gum, Candy bar, or other treat
Cut paper to fit around your treat with an extra half inch to adhere two the two sides. I am using measurements for a pack of gum in this tutorial, but you can adjust to whatever treat you use.
For the gum, cut the paper to 4" x 5 1/2". Score at 2", 2 1/2", 4 1/2" and 5" on the long side.
Adhere the two ends together to form a "sleeve" for the treat to slide into.
Embellish the sleeve as you wish. I used an image I stamped on another piece of paper, then I cut it out and used dimensionals to attach it to the front. I stamped the image on another patterned piece of paper and cut out the egg portion and attached it just to give it a little more dimension. This technique is called paper piecing. It's a fun way to piece together an image using different colored or patterned paper.
Squeeze the front and back panels together at the top of and using a hole punch, punch through both layers.
Thread the ribbon through both holes until the ribbon has an equal length on front and back.
Slide the treat in the sleeve pushing the ribbon down to the bottom.
Tie the ribbon in a knor or a bow.
When you pull the ribbon up, the teat will slide up out of the sleeve. You can put a little tag with instructions to "pull" if you like.
This is a really fun project because you can adjust it to pretty much anything! Some ideas to use are packs of gum, Candy bars, Microwave popcorn, hot chocolate packs, or gift cards. Just be creative!
Thanks for stopping by! Comment to let me know if you want more tutorials for Easter treats and what tutorials you would like to see.
Have a great rest of the week!


No comments:
Post a Comment