Tuesday, August 16, 2011
Bye Bye Summer :(
This week school has started, the weather out has finally started to cool down a little, which means, in a sense, summer is officially over :( Our summer kids have all gone back home to start school and that has left our house very quiet all of a sudden! That means it's time to start filling my time with my blogging, crafting, etc. to occupy myself. I have been promising that I'm opening my Etsy shop, posting more tutorials, more giveaways and I have been horrible about following through with that since the summer started! I apologize for that, I had good intentions that I would keep up while all the kids were here, and as you can see, that didn't happen so much! We had a great time and we are looking forward to their first break from school so they can come back, but until then, it's time to go to work! Starting today.....I'm working on some new projects, I have my camera all set up for some tutorials, and I'm brainstorming some new ideas! Here we go!


Saturday, August 6, 2011
Lingerie Bag Tutorial
Hello everyone! I finally finished my tutorial that I've been working on this week for you guys! I'm so excited about how it turned out! I've had a few comments and emails from people not knowing how to use digital stamps. They are so fun and versatile to work with....you are only limited by your imagination really. Today, I wanted to introduce you to a really fun way to use them.....that's a little different than the norm! I have a really cute digital stamp image of a lingerie set from JW Illustrations and I immediately thought of this project! Here's what I started with:


I'm really pleased how it turned out and it was a lot easier than I thought it would be. The hardes part was having to hand sew everything! It took much longer that way, but it was nice to sit and stitch in front of the tv for a change. Now, this would not HAVE to be done by hand, but I am without a sewing machine at the moment.......soon to change, I hope!
This type of project using digital stamps to create something with fabric is much easier when using an image that has larger scaled pieces. Does that make sense?! It would be harder to use an image with a lot of small detail, because you would have to cut and piece much smaller pieces of fabric together. Now, it would be totally do-able, just more tedious.
Supplies needed:
lingerie laundry bag (I bought my little lingerie laundry bag at the dollar store, so very reasonable)
digital stamp image
scrap pieces of fabric used for lingerie
old tshirt used for backing
sewing supplies (thread, straight pins)
ribbon, lace and cording used for detail on lingerie
So I started out with my lingerie laundry bag

I printed out 2 of the Amber Lingerie Digital Stamp from JW Illustrations. One on regular printer paper (used for the tshirt pattern) and one on card stock (used for the fabric pattern)

Take your image printed on printer paper and cut it out leaving a small border around it. Doesn't have to be precise - this border ends up getting trimmed off later.

I took one of J's old tshirts and cut out a piece large enough for the images, pinned my pattern on with straight pins and trimmed around my pattern leaving a little bit of a border around. This border is not really needed and get trimmed off later, but it does make it easier to work with having a little extra there when stitching.


Now take your image printed out on card stock and cut out the part of the image that will be your fabric.

Now lay your fabric with the printed side down - so you're marking on the backside of it. Put a temporary adhesive on the front of your cardstock pieces - I just used pieces of rolled scotch tape - to hold your pattern in place while tracing around it. Since your fabric is face down, you also want to be sure to lay your pattern face down also. Use a light pen and trace around your pattern and cut it out. If you're really good and have a good adhesive, you can just cut around the pattern and cut out the tracing.....but I'm not that good!

Now pin your fabric to your tshirt.

Now start stitching! After you have your fabric all stitched to your tshirt, you can start having fun with the lace, ribbon and cording to add details to your lingerie! I used a satin ribbon for the straps, the organza lace with sequins on the edges as shown on the original stamp image, organza ribbon for the bows and some black cording across the bottom of the bust line. On the bottoms, I used the black cording for the string part and the organza ribbon for the bows. You could really go crazy and use your imagination with this part, but I tried to stick to the original image as I could for this one. When you're finished with fixin' it up, you can trim off the extra tshirt. You still wanna leave a little edge so it's easier to stitch onto the laundry bag.

Now just stitch it to your lingerie laundry bag! That's it! Pretty simple! I think this would be a cute bridal shower gift with a Victoria's Secret gift card inside.

Now if you have a sewing machine and/or a better seamstress than I, you could cut out a few of these steps and do all the stitching at one time, instead of one thing at a time, like I did! Again, I'm just not that good yet!
Here are a few closer shots of the details:


I hope you enjoyed the tutorial, and if you still have questions, please email or leave them in the comments section. I will be happy to answer any you may have. I would also love to see any of your lingerie bags that you make using this tutorial! Please send me a link or leave the link in the comments section. So head on over to JW Illustrations to get your image and get started!
I am linking this project to these link parties - you can link yours too!


Have a great week!
Cute right?! So my idea was to use this as a template and create my own little mini lingerie out of fabric to sew on the front of a lingerie laundry bag. This is the final product:

This type of project using digital stamps to create something with fabric is much easier when using an image that has larger scaled pieces. Does that make sense?! It would be harder to use an image with a lot of small detail, because you would have to cut and piece much smaller pieces of fabric together. Now, it would be totally do-able, just more tedious.
Supplies needed:
lingerie laundry bag (I bought my little lingerie laundry bag at the dollar store, so very reasonable)
digital stamp image
scrap pieces of fabric used for lingerie
old tshirt used for backing
sewing supplies (thread, straight pins)
ribbon, lace and cording used for detail on lingerie
So I started out with my lingerie laundry bag

I printed out 2 of the Amber Lingerie Digital Stamp from JW Illustrations. One on regular printer paper (used for the tshirt pattern) and one on card stock (used for the fabric pattern)

Take your image printed on printer paper and cut it out leaving a small border around it. Doesn't have to be precise - this border ends up getting trimmed off later.

I took one of J's old tshirts and cut out a piece large enough for the images, pinned my pattern on with straight pins and trimmed around my pattern leaving a little bit of a border around. This border is not really needed and get trimmed off later, but it does make it easier to work with having a little extra there when stitching.


Now take your image printed out on card stock and cut out the part of the image that will be your fabric.

Now lay your fabric with the printed side down - so you're marking on the backside of it. Put a temporary adhesive on the front of your cardstock pieces - I just used pieces of rolled scotch tape - to hold your pattern in place while tracing around it. Since your fabric is face down, you also want to be sure to lay your pattern face down also. Use a light pen and trace around your pattern and cut it out. If you're really good and have a good adhesive, you can just cut around the pattern and cut out the tracing.....but I'm not that good!

Now pin your fabric to your tshirt.

Now start stitching! After you have your fabric all stitched to your tshirt, you can start having fun with the lace, ribbon and cording to add details to your lingerie! I used a satin ribbon for the straps, the organza lace with sequins on the edges as shown on the original stamp image, organza ribbon for the bows and some black cording across the bottom of the bust line. On the bottoms, I used the black cording for the string part and the organza ribbon for the bows. You could really go crazy and use your imagination with this part, but I tried to stick to the original image as I could for this one. When you're finished with fixin' it up, you can trim off the extra tshirt. You still wanna leave a little edge so it's easier to stitch onto the laundry bag.

Now just stitch it to your lingerie laundry bag! That's it! Pretty simple! I think this would be a cute bridal shower gift with a Victoria's Secret gift card inside.

Now if you have a sewing machine and/or a better seamstress than I, you could cut out a few of these steps and do all the stitching at one time, instead of one thing at a time, like I did! Again, I'm just not that good yet!
Here are a few closer shots of the details:


I hope you enjoyed the tutorial, and if you still have questions, please email or leave them in the comments section. I will be happy to answer any you may have. I would also love to see any of your lingerie bags that you make using this tutorial! Please send me a link or leave the link in the comments section. So head on over to JW Illustrations to get your image and get started!
I am linking this project to these link parties - you can link yours too!
Have a great week!
Monday, August 1, 2011
Little Red Riding Hood Sweet Treats & Say it Monday
Here we are for another post for JW Illustrations. I really adore this cute Little Red Riding Hood image! She's so sweet.

This is my "You're so Sweet" card that Little Red Riding Hood is going to deliver with her basket of sweet treats to someone special.

The fruit is filled with some kisses, but you could put just about anything you wanted in it. The cute basket is made using some of JW Illustrations digital paper called Strawberry-licious! I used the cute red and white gingham pattern, but there is 10 papers in all in this bundle.

I got the basket template here and the template for the apples here. The image is in the form of a digital stamp, so you're able to color it however you want, with any colors you want. Digital stamps are so fun and versatile. You can use the same image for different projects and use different colors and it looks totally different.

I hope you liked the Little Red Riding Hood project! Go to JW Illustrations to see the rest of the design team's creations! Also, link up your own Little Red Riding Hood project for the challenge.
It's also Say It Monday!! Any new comments on any post will get you a little treat from me! Since my post is so behind today, any comments made through tomorrow (Tuesday) midnight will be accepted. As always, any new follows via twitter, facebook, or email qualifies also - but you have to leave a comment to let me know!
This post is linked to these link parties - go and link yours too!


Thanks for stopping by!

This is my "You're so Sweet" card that Little Red Riding Hood is going to deliver with her basket of sweet treats to someone special.

The fruit is filled with some kisses, but you could put just about anything you wanted in it. The cute basket is made using some of JW Illustrations digital paper called Strawberry-licious! I used the cute red and white gingham pattern, but there is 10 papers in all in this bundle.

I got the basket template here and the template for the apples here. The image is in the form of a digital stamp, so you're able to color it however you want, with any colors you want. Digital stamps are so fun and versatile. You can use the same image for different projects and use different colors and it looks totally different.

I hope you liked the Little Red Riding Hood project! Go to JW Illustrations to see the rest of the design team's creations! Also, link up your own Little Red Riding Hood project for the challenge.
It's also Say It Monday!! Any new comments on any post will get you a little treat from me! Since my post is so behind today, any comments made through tomorrow (Tuesday) midnight will be accepted. As always, any new follows via twitter, facebook, or email qualifies also - but you have to leave a comment to let me know!
This post is linked to these link parties - go and link yours too!
Thanks for stopping by!
Friday, July 29, 2011
Join me on Facebook now!
I finally just added a facebook account for all my crafts, home decor, cooking, DIY's, etc. I really am trying to focus on my blog, my crafting, and my Etsy shop (still in the works! coming soon!) and hopefully gain some more followers/friends by doing this. I have learned from many of the talented bloggers out there that you really have to be involved in Facebook, Twitter, Pinterest and any other social networks to lead the way to your blog that lots may be very interested in, but just don't know about it yet. You may not have to do ALL of them, but doing at least one of them does boost your stats. So click here and add me or click the Facebook button on the sidebar. See you there!
I just love Fridays! J gets off at noonish today and we're going to see Cowboys and Aliens! He's been waiting for this to come out for months now!
Have a super weekend!
I just love Fridays! J gets off at noonish today and we're going to see Cowboys and Aliens! He's been waiting for this to come out for months now!
Have a super weekend!
Tuesday, July 26, 2011
Thank You!
Thank you for all your sweet comments! I have some special gifts to send out tomorrow! In the meantime, you can follow me on Twitter @StampingStone, or sign up to get updates via email.....just click one or both of the buttons on the right! Stay tuned for another fun project to be posted soon!
Also, it's not too late to enter the fun challenge at JW Illustrations. Grab her fun firetruck digital stamp for only $1 and create a project to enter this challenge and win a $10 coupon to JW Illustrations! Click here to see the post with all the design team projects. Such fun ideas!
Have a great day!
Monday, July 25, 2011
Home Sweet Home
JW Illustrations has THE cutest clip art bundle called "Home Sweet Home". I just love the trendy color combo and the fun images. For this project, I decided to do a card that would be perfect to give to a new homeowner or someone that just moved to a new house.


I printed out 3 images and cut and pieced it together to create a nice dimension. On one of the images, I cut out the front door and layered the piece without the door on top to make the door appear to be a little sunken - kind of a reverse 3D I guess!
Inside I stamped a simple "Congratulations". You could add any handwritten sentiment to that to fit the exact occasion. I layer the white card stock just like I did on the front.

Next I used the same image and printed out some address labels. I used my own name and address on these, since we just moved and I needed some myself! But, as soon as one of my good friends (hi candy!) moves, she'll be getting these beauties! I made a little matchbook type holder for the labels.
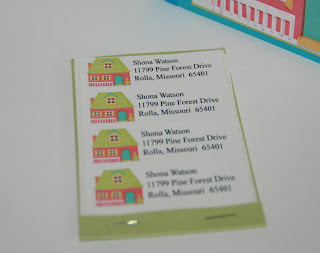
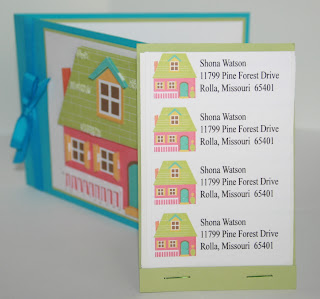
As you can see, I tied a ribbon around the front of the card, so I just used the ribbon on the inside to tuck the matchbook of labels in so they stay put.

Here's a shot of the card and labels together. I just LOVE Love love these colors!

A few more details that you may not have noticed is the little flower pot. I cut it out to layer on, tied a little silver cord around it and added some crystal effects to make it shiny. The little flower is just one that I had and I added a little turquoise brad in the middle. (You can click on any of the images to see them larger)
Another fun little technique that I did was to use the micro beads some of the shingles. I love those micro beads! It's been so long since I used them.....I use to bead EVERYTHING!! lol! I just cut out a few random shingles and added the red lined tape and then smushed them in the beads - in this case, I used the clear ones. Cute, right?!

Click here to see the other images in this clip art bundle. I hope you enjoyed the project today!
I linked my project to Tip Junkie - Tip Me Tuesday! You can link up your project too!

I also added my link to Today's Creative blog.....add yours too! She is also promoting an awesome deal on the Silhouette with a discount code. Go check it out!


Remember it's still "Say It" Monday! Any new comment will get a special gift from me!
Have a great week!

See the dimension?

I printed out 3 images and cut and pieced it together to create a nice dimension. On one of the images, I cut out the front door and layered the piece without the door on top to make the door appear to be a little sunken - kind of a reverse 3D I guess!
Inside I stamped a simple "Congratulations". You could add any handwritten sentiment to that to fit the exact occasion. I layer the white card stock just like I did on the front.

Next I used the same image and printed out some address labels. I used my own name and address on these, since we just moved and I needed some myself! But, as soon as one of my good friends (hi candy!) moves, she'll be getting these beauties! I made a little matchbook type holder for the labels.


As you can see, I tied a ribbon around the front of the card, so I just used the ribbon on the inside to tuck the matchbook of labels in so they stay put.

Here's a shot of the card and labels together. I just LOVE Love love these colors!

A few more details that you may not have noticed is the little flower pot. I cut it out to layer on, tied a little silver cord around it and added some crystal effects to make it shiny. The little flower is just one that I had and I added a little turquoise brad in the middle. (You can click on any of the images to see them larger)
Another fun little technique that I did was to use the micro beads some of the shingles. I love those micro beads! It's been so long since I used them.....I use to bead EVERYTHING!! lol! I just cut out a few random shingles and added the red lined tape and then smushed them in the beads - in this case, I used the clear ones. Cute, right?!

Click here to see the other images in this clip art bundle. I hope you enjoyed the project today!
I linked my project to Tip Junkie - Tip Me Tuesday! You can link up your project too!
I also added my link to Today's Creative blog.....add yours too! She is also promoting an awesome deal on the Silhouette with a discount code. Go check it out!
Remember it's still "Say It" Monday! Any new comment will get a special gift from me!
Have a great week!
Subscribe to:
Posts (Atom)