Pages

Tuesday, May 19, 2009

Blogger's Challenge - FINALLY!

This is getting posted really late!! I actually had it done on time, but didn't get it photographed until today to post it. My mom and dad were here from Arkansas last week for a visit and time just gets away from you when you're visiting and having fun! My mom loves to stamp and craft, so we did some of these projects together, but I didn't take the time to photograph and post. My mom also fell and broke her knee cap while they were here! That added to the chaos! Since she couldn't go up and down stairs, they ended up staying at our house the whole time they were in town, instead of rotating to stay with all her kids like usual. So guess what? EVERYONE was at our house most of the days!! It was so fun and I love having everyone at our house, but that sure does add chaos when you have 10 adults and 13 kids - not to mention the neighbor kids that are always here too!! It was great!

Anyway, our challenge was to "CASE" yourself - which means "Copy" something that you've done before, but change 2 things about it. I made one of these for my father-in-law for his birthday last month and it was so fun and easy! As you can see, I had several little flowers and leaves cut out to embellish it, but haven't gotten that far yet! It's called an "Album in a Box". It looks like a box when the lid is on, but once you take the lid off, the sides fall down. You put pictures or journaling, or whatever you want on the flaps - both sides if you want! It's a great gift for grandparents, as I found out! My mother-in-law wants one now!


I will try to put together a little tutorial with directions on how to do this in a day or so. You will be so surprised at how easy and fast these are to put together. Mom and dad left yesterday, so the house is a lot quieter, but now I have tons of cleaning and laundry to catch up on! Hope you're having a great week so far!


Friday, May 8, 2009

Blogger's Challenge for Mom

This week, the challenge was to create something for Mom. I started out making these for Hope's teachers for Teacher Appreciation week, and then decided to make them for my friends and family members who are moms for Mother's Day, and liked them so well, that I'm giving one to my mom too! These are so easy to make and such great gifts! This first picture is with the ribbon and tag tied to the tile.


I get these tiles at Hope Depot in a package of 9 for $5.99. You can get them in all colors and also in a glossy finish. I prefer these that are called "tumbled tiles". They are kind of roughed up and a bit chipped here and there. I love the look of the imperfections in them. Here is a shot of the tile without the ribbon tied on.

To make these you need to use a pigment or craft ink, and then place them on a cookie sheet in the oven for about 10 minutes at 350 degrees to heat set the ink. You must let them fully cool before touching the ink! It will still smear and appear to not be "set" if it's still hot. Trust me, I learn the hard way -- I just can't keep my fingers off them while they are cooling! LOL! With these, I put the them in the oven 2 different times since I layered the colors and images. I first stamped the grass image from "Inspired By Nature", baked it, then stamped the flower image and the saying and then baked it again. For the tag, I used the Wide Oval punch and stamped the small flower image from the flower stamp using Navy Craft ink and clear embossing powder. I think they turned out very pretty and want to keep one for myself!

Thanks for looking! Have a great weekend!


Monday, May 4, 2009

Blogger's Challenge 97 - Sketch Challenge

I'm finally getting this posted!! I was suppose to have it posted on Friday, but had to let my camera battery charge overnight, and then the weekend just got away from me! They tend to do that these days!

Anyway....our challenge was to make a project using this sketch:
I turned my sketch a different direction and I even used the same colors - they looked very nice together, I thought, on the sketch diagram! I had a little bit of trouble with this one on knowing when to stop! Ha ha! I kept adding flowers, buttons, rhinestones, and before I know it, it may be a little too much!

I used my Big Shot Texturz plates on the bottom black base (the larger polka dots) and then on the gray vertical piece (the smaller polka dots). That may be a little hard to see in the picture. It actually started out being a small scrapbook page, but then kind of evolved into just a "picture" in itself. I will either tie some of the purple ribbon on the top corners and hang it, or put a little stand on the back to stand it up.
That's it for now! Maybe another post later today! Hope everyone is having a great start to your week!

Monday, April 27, 2009

My Time To Color Challenge 01

Another challenge done today! This one was really fun! It was a color challenge - we had to use the following colors, but I also used the bag as an inspiration to the design of my project.

I'm posting two photos, but the lighting is not very good on either! Sorry about that! (and I just noticed that I forgot to crop the second picture!)

My project is an altered journal - which is just a journal/notebook that I made my own cover for. I love these as gifts! I used my Pina Colada Simply Scrappin kit again (retired) because it had some of the colors and the flowers matched the design on the bag. One of the flowers is a rub on and I mounted some of the stickers on turqoise cardstock to pull in that color.

I used Craft ink for the background flourishes with clear emobossing powder. It didn't show up as well as I hoped on the dark cardstock, but it still worked! I also used chipboard letters that I colored with my Sharpie markers (LOVE my sharpie's!) and spelled out the "journal" on the front. It's hard to see in the pics, but I added a little bling to the center of all the flowers. It adds just enough sparkle to the project -- but then again, I don't think you can ever have TOO much of bling! {wink!} I like how some of the flowers are off the edge of the book. This is a great tip to do when you're doing a "collage" or lots of randomly placed images; it really makes it look balanced. Just fill in the space that you need and trim off the excess. If you look closely, you can see that the excess that I trimmed off the top left red flower, I added to the bottom left edge, so nothing was wasted!

That's it for today! I will have another project to post tomorrow, so remember to check back! Thanks for stopping by.


Friday, April 24, 2009

Blogger's Challenge - this week Alter It!

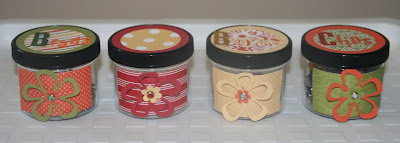
This week was a fun challenge! We had to alter something - there were some very creative ideas! I have saved these little plastic jars forever, intending on doing something with them, and thanks to this challenge, it finally got done! There was originally spices in them that came in a "Chili Kit" that we got for Christmas one year. Here's the front view:


Here's a view showing the top and the front of the jars. I used Stampin' Up!'s retired Pina Colada Simply Scrappin' kit, some chipboard letters and some Sissix die cuts to decorate them.


Here's the top view. As you can see, I ran out of ideas of what to put in them! I have Brads, Buttons, Clips and one empty one until I decide what to put in it -- any ideas??

Here's a little side view of the pretties that are in the jars! Wow, I had a lot of rhinestone brads!


I'm throwing out a challenge to all of you to alter something - we all have things that we've saved wondering "what could I do with this?".......right? Well, time to do something with it and email me with your altered item and I will post pics of them all. Maybe I'll even have a prize for my faves!


Thursday, April 23, 2009

I'm So Excited! My Timeless Template Challenge 01

I am participating in the "My Timeless Template Challenge" - the very first one! I have been an admirer of Lauren's work for quite some time and am excited to participate! I used the "For Keep{sake}" template for my project. The challenge was to use bath products for inspiration. I made my own bath salts for the project. I just googled "homemade bath salts" and came up with lots of different websites. It was easy! Here's my project:

I love this little penguin image! I did little individual packets for single use using some small ziploc baggies. Here's a close up of the baggie:

I used the ribbon to make her little hula skirt. I trimmed off the edge so I was able to fray it up to the middle stitched part. I gathered it using mini glue dots and then trimmed the frayed part to fit the image. I used little strip of rhinestone stickers around the waist to bling it up a bit! Speaking of bling - I cut out the flower and her bikini top from an extra stamped image and glittered it, then layered it on top to give it some dimension. Cute, huh?!

I wrapped the ribbon around the lid and added the little "Relax" tag. It was a fun project! Now......who do I give it to??!!! Hmmm. Have to think about that one! Here's another view - of course, it looks much better IRL! I was bummed that I didn't have a rhinestone flower brad (that's on the top) that matched the color better, but I still think it works!

That's it for today! Stay tuned for my Blogger's Challenge to be posted tomorrow! It's an "Alter It" challenge. Have a great day!


Friday, April 17, 2009

Blogger's Challenge #95 - Color Challenge

This week's challenge was to use the following colors on a card: Always Artichoke, Sage Shadow, Chocolate Chip, and Sahara Sand, and a neutral if you wanted. I, like everyone else that I've been reading, had a hard time working in that Sage! I kind of masked it a lot with other ink colors to try to make it "blend" a little better!


I started out with an Artichoke base and layered the top half with Sahara Sand, after I ran it through my wonderful Big Shot on the Damask Texturz plate. I did use a sponge and kind of "rub" a little chocolate ink on the Sand to kind of dirty it up a little and make it a little less stark. Then layered the bottom half with the Sage. I used a few different stamps from the "Wanted" set to make my own background paper. I used both Arthchoke and Chocolate ink on it - if you click to enlarge the picture, you may be able to see that better.
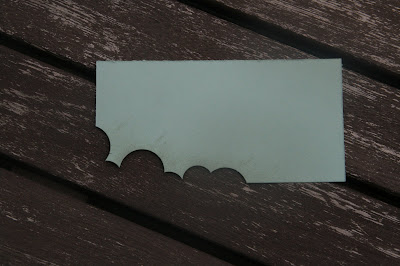

I stamped the horse image from the "Wanted" set on Vanilla using the Sahara Sand ink, and then stamped the saying from the "Best Wishes and More" set with Chocolate ink. I made the dust from the running horse by using a piece of scratch paper and making a template using different sized circle punches and then sponging Sand ink while moving it around a little. Here's what my template looked like:


Then I tied some of our yummy 5/8" Chocolate grosgrain ribbon around with a little lasso (our natural color hemp twine) tied in the knot.

I think that's about it! It was a fun challenge and I'm looking forward to the next one. Now that we're all moved and settled - notice I said "settled" and not "organized"!! - I think I'll be able to play a lot more. I also have my own stamp room now too!

Have a great weekend!